Favicon or also known as favorite icon is a file that is used as icon of a website and usually this file is. ico/. png. This Favicon is square shaped and very small in dimension, generally with dimensions of 228 x 228 pixels. If you notice, the Web Favicon of Nyari know is like this
What is Inkscape?
Inkscape is a free, professional vector graphics creator software. Friend know can download it directly through the site directly here.
Creating a Favicon Blog using Inkscape
In order for the Favicon that we make later acceptable to bloggers, of course we must first know the terms of receipt of our Favicon. According to the blogger rules, our favicon must be 228 x 228 pixels in size as well as. ico or. png. Actually. JPEG can also, however I do not recommend using this extension because it will be less than the Internet browser.
Okay right away we started, here are the steps:
Okay right away we started, here are the steps:
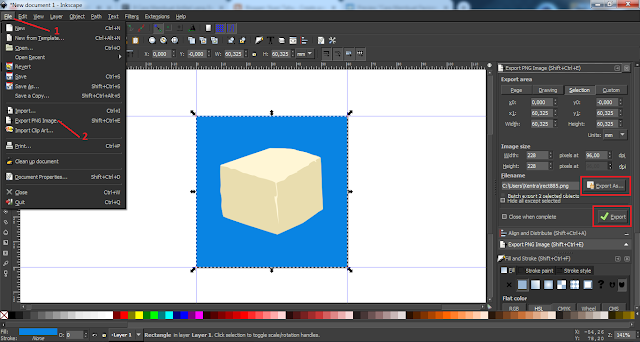
1. 1. I think you've installed the Inkscape software. Just start the installed Inkscape software already. Then we first set the size of the image, by clicking File and then select Document Properties.
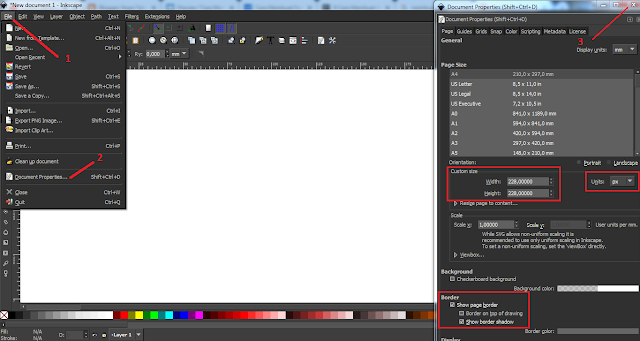
Then set the resolution type to PX (pixel), and then set the Width and Height to 228px and don't forget the Show Page Border. After that close the Document Properties window.
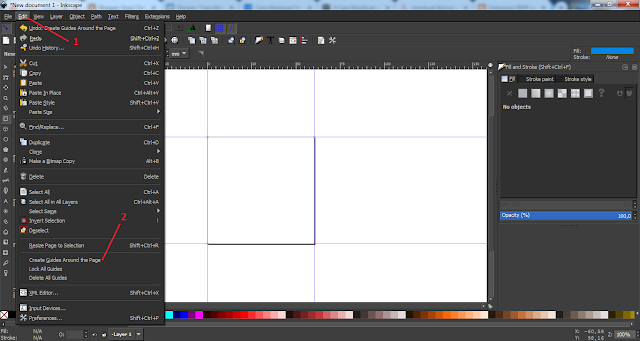
2. After that it will appear page Bordernya. Before creating the image we first activate the Guide feature by clicking Edit and then select Creates Guide Arround the Page. So the appearance is changed to like below.
3. Enable the SNAP nodes, paths and handles feature. Then select Create rectangles and squares and start creating a square by clicking hold there is a top left corner of the Page Border. Drag until it touches the lower right corner then release. If it is, then the result will be like this.
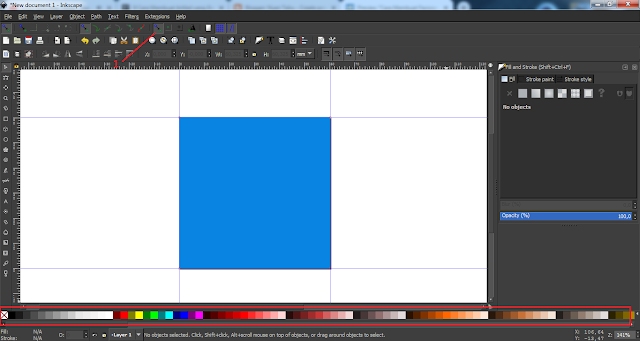
You can change the color of the created square image by selecting a color in the Colour Table.
4. You can add the blog logo/website either in the form of PNG or JPEG. And place it right in the middle square.
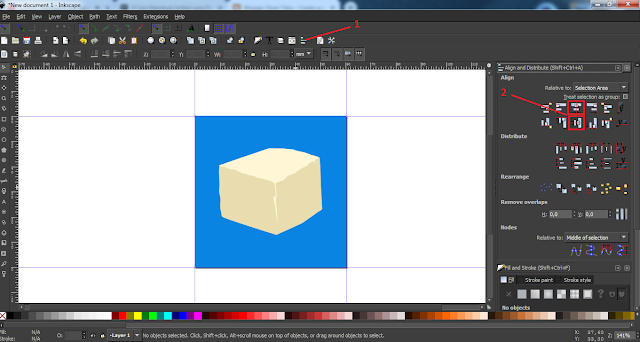
To make it look more neat, click the square image and press hold Shift key then click the logo to select both images. After that select the Align and distribute Objects feature, then select Center on vertical axis and Center on horizontal axis. The result is like the picture above. Set it up as you please so that your favicon is unique and cool to look at. One thing to note is that don't let the logo or image exceed the image of the segment.
5. If you are familiar with the results of its edits then it is time to Export our favicon. First we select the image of the segment by clicking on it, then select the File menu and then select Export PNG Image. So the Export window appears, in the Export As feature specify the location and filename of our favicon. If you just select Export immediately.
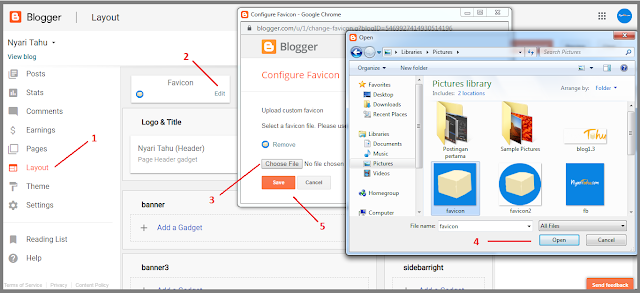
Well, the Favicon has been created. The next step is to replace our old favicon with the one we just created. The trick is that you log in and log in to the Blogger page then enter the Menu Layout click Edit. After the Configure Favicon window appears please select our Favicon file then click on Save.
After making a favicon change usually the Favicon blog/website We do not directly change, have to wait about about a day to be approved by Blogger. My experience alone had to wait 1 day, after that the favicon has changed.
How? Easy is not it? So how to create a Favicon Blog using Inkscape. If you are still confused, you can ask in the comments field.